How to Use Subsystem Updates
This is a beta feature. Check and perform the instructions to enable beta features.
Also, let us know what you think about the feature and what else you need:
Contact us!Introduction
This article aims to bring information on how to use Subsystem Updates. This Torizon Cloud feature enables secure firmware updates to secondary systems (subsystems) connected to the primary system (Toradex System on Modules - SoMs).
Prerequisites
- Basic understanding of subsystem updates. Refer to Overview of Subsystem Updates article.
- Follow the steps described in First Steps With Subsystem Updates article.
- Basic understanding of Torizon Cloud features.
- Secondary device (subsystem) of your choice.
- A Toradex System on Module with Torizon OS installed.
Configure the Subsystem Updates Mechanism
The following steps bring instructions to set up the availability of the secondary device in the Torizon Cloud, beyond the set of commands to fetch and install the firmware.
Step 1: Enable the Subsystem
In order to inform Uptane of the path to the file that describes the system components, create a file in the .toml format into the /etc/sota/conf.d directory. This file should be named 99-secondaries.toml, where 99 indicates the file priority among all those that may exist for this purpose.
[uptane]
secondary_config_file = "/home/torizon/secondaries.json"
To update a generic secondary device connected to the module, inform the system of its existence. For this process, go to /home/torizon and create the secondaries.json file describing the components in the operating system:
{
    "docker-compose": [
        {
            "partial_verifying": false,
            "ecu_hardware_id": "docker-compose",
            "full_client_dir": "/var/sota/storage/docker-compose",
            "ecu_private_key": "sec.private",
            "ecu_public_key": "sec.public",
            "firmware_path": "/var/sota/storage/docker-compose/docker-compose.yml",
            "target_name_path": "/var/sota/storage/docker-compose/target_name",
            "metadata_path": "/var/sota/storage/docker-compose/metadata"
        }
    ],

    "torizon-generic": [

        {
            "partial_verifying": false,
            "ecu_hardware_id": "<SoM_family>-<SoC_type>-bootloader",
            "full_client_dir": "/var/sota/storage/bootloader",
            "ecu_private_key": "sec.private",
            "ecu_public_key": "sec.public",
            "firmware_path": "/var/sota/storage/bootloader/u-boot.img",
            "target_name_path": "/var/sota/storage/bootloader/target_name",
            "metadata_path": "/var/sota/storage/bootloader/metadata",
            "action_handler_path": "/usr/bin/bl_actions.sh"
        },

        {
            "partial_verifying": false,
            "ecu_hardware_id": "<secondary_device_name>",
            "full_client_dir": "/var/sota/storage/<secondary_device_name>",
            "ecu_private_key": "sec.private",
            "ecu_public_key": "sec.public",
            "firmware_path": "/var/sota/storage/<secondary_device_name>/<firmware_binary_name>",
            "target_name_path": "/var/sota/storage/<secondary_device_name>/target_name",
            "metadata_path": "/var/sota/storage/<secondary_device_name>/metadata",
            "action_handler_path": "/usr/bin/<secondary_device_name>_actions.sh"

       }
    ]
}
Be aware to replace <SoM_family> with the SoM family (e.g. Colibri, Apalis, or Verdin), <SoC_type> with the module SoC (e.g. imx6/6ull/7/8/8x/8mm/8mp), <secondary_device_name> with the subsystem name (or any other appropriate name), and <firmware_binary_name> with the firmware binary file.
For more information about the variables, check the Configuring Aktualizr section in the First Steps With Subsystem Updates article.
Step 2: Configure the Update Instructions
After enabling the secondary device, create an action handler file (<secondary_device_name>_actions.sh) containing information on how the operating system should respond if it detects a request for an update, providing a step-by-step guide. It can be a script, a Python file, or even a binary file. Check out our ready-to-use examples in the Action Handlers repository on GitHub. In this case, using a script, into /home/torizon create the file with the following structure:
#!/usr/bin/bash
# ---
# Main program
# ---
case "$1" in
    get-firmware-info)
        # Perform normal processing for this action.
        echo "ACTION HANDLER: get-firmware-info"
        exit 64
        ;;
    install)
        # Perform normal processing for this action.
        # Comands to perform the firmware update
        echo '{"status": "ok", "message": "New firmware installed"}'
        exit 0
        ;;
    complete-install)
        # Perform normal processing for this action.
        echo "ACTION HANDLER: complete-install"
        exit 64
        ;;
    *)
        # Perform normal processing for this action.
        echo "ACTION HANDLER: ERROR event $1 not supported"
        exit 64
        ;;
esac
Then, in the terminal, add the execution permission to the file:
# chmod +x <secondary_device_name>_actions.sh
Regarding the install section, it should contain the commands to be executed during the update of the subsystem connected to the module. It is possible, for example, to include the command to run a container responsible for updating the current firmware.
For more information about the script sections, see the Understanding the Action Handler section in the First Steps With Subsystem Updates article.
Use Case: Subsystem Update in an Ai-Thinker ESP8266 12-E NodeMCU
This is just one example out of all possible use cases enabled by Subsystem Updates. Visit our Action Handler repository to learn about others.
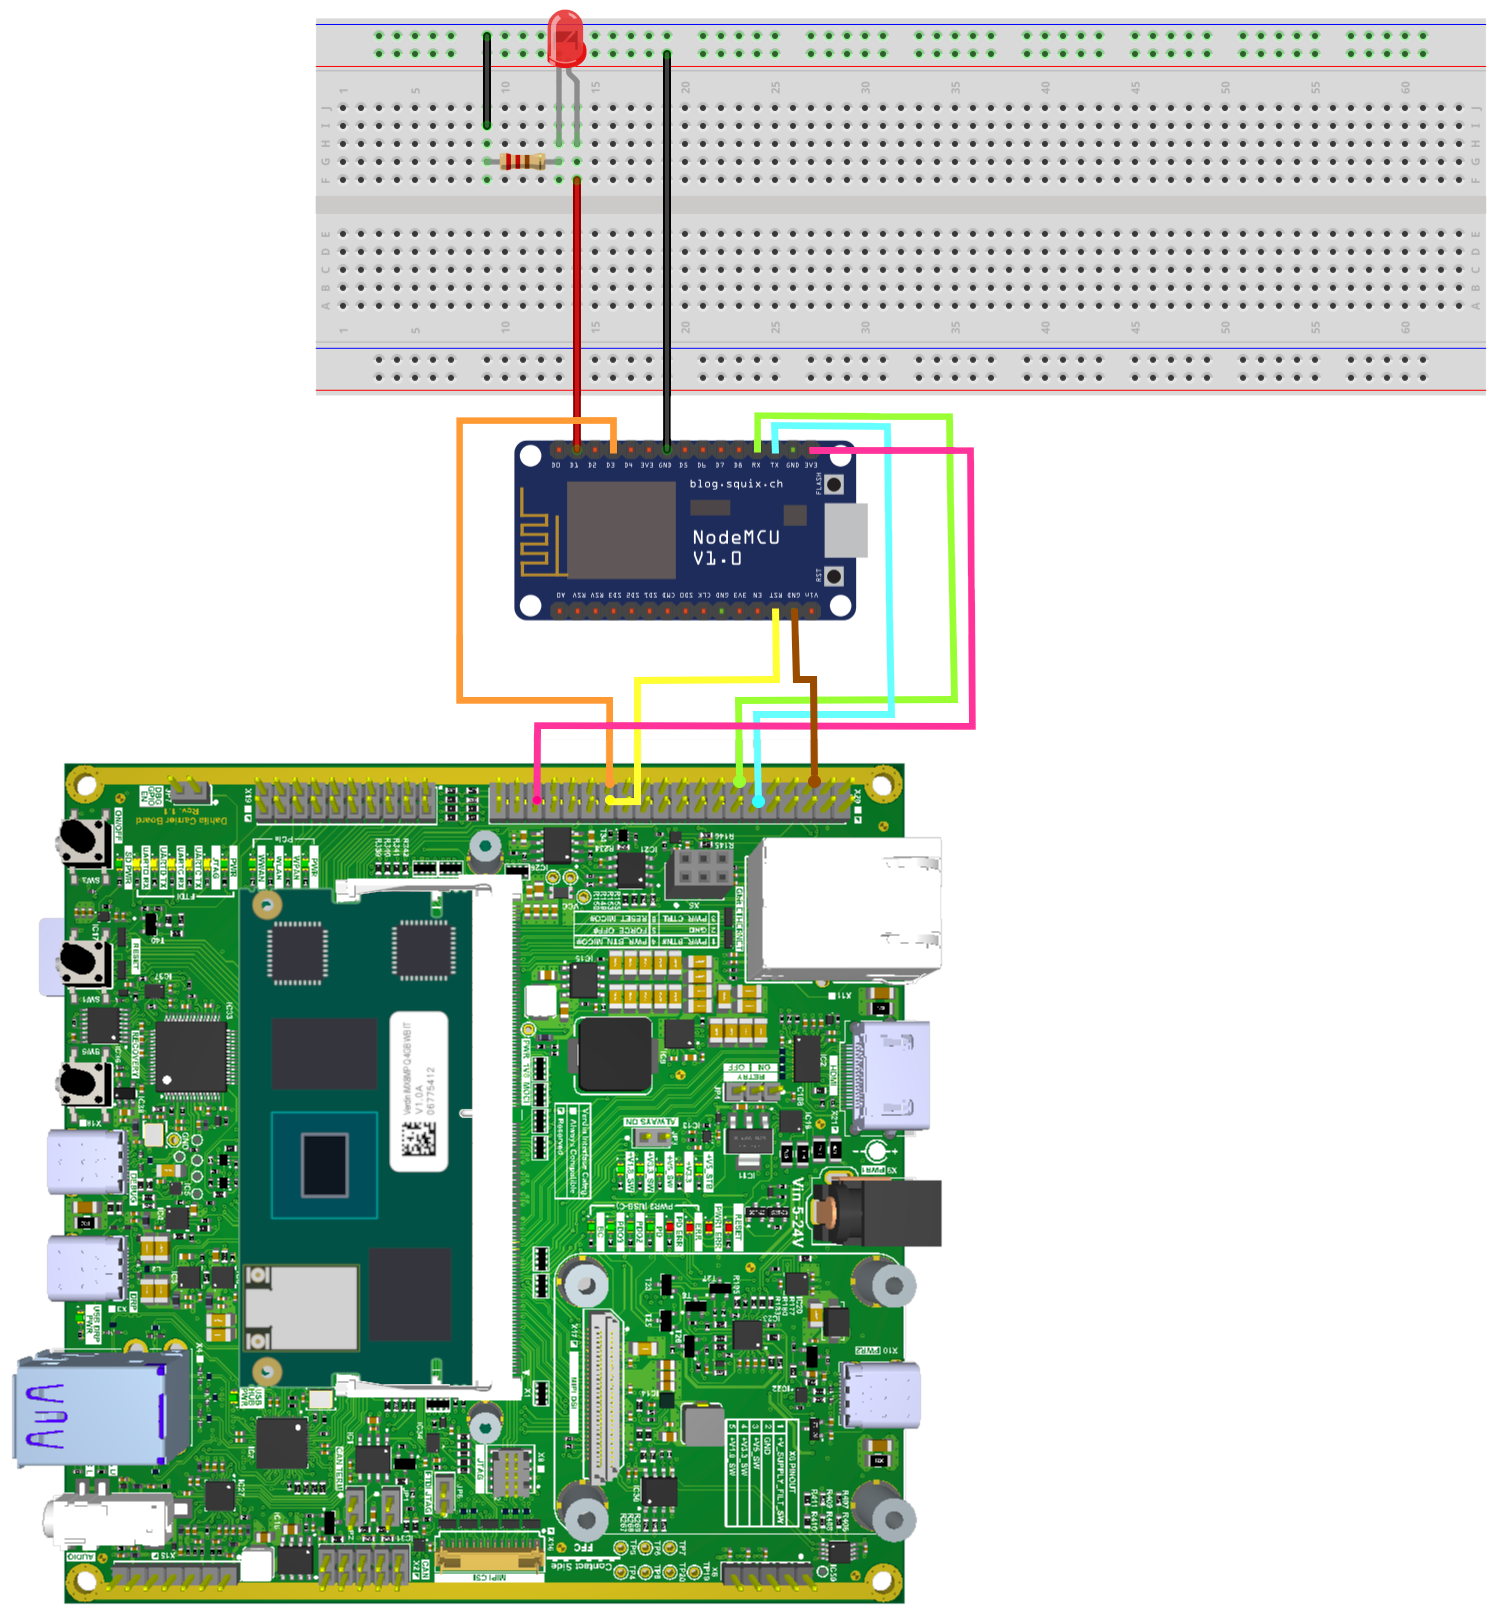
This section brings the use case of updating the firmware of a subsystem (Ai-Thinker ESP8266 12-E NodeMCU) connected via serial to a Toradex Verdin iMX8M Plus module. The project has the objective of simply controlling an LED blinking. The image below shows the setup of a Dahlia Carrier Board with the ESP8266 12-E NodeMCU and the Verdin iMX8M Plus.
Enable the ESP8266 12-E NodeMCU
After configuring the 99-secondaries.toml file (see it in Step 1: Enable the Subsystem section), the secondaries.json file is created:
{
    "docker-compose": [
        {
            "partial_verifying": false,
            "ecu_hardware_id": "docker-compose",
            "full_client_dir": "/var/sota/storage/docker-compose",
            "ecu_private_key": "sec.private",
            "ecu_public_key": "sec.public",
            "firmware_path": "/var/sota/storage/docker-compose/docker-compose.yml",
            "target_name_path": "/var/sota/storage/docker-compose/target_name",
            "metadata_path": "/var/sota/storage/docker-compose/metadata"
        }
    ],
    "torizon-generic": [
        {
            "partial_verifying": false,
            "ecu_hardware_id": "verdin-imx8mp-bootloader",
            "full_client_dir": "/var/sota/storage/bootloader",
            "ecu_private_key": "sec.private",
            "ecu_public_key": "sec.public",
            "firmware_path": "/var/sota/storage/bootloader/u-boot.img",
            "target_name_path": "/var/sota/storage/bootloader/target_name",
            "metadata_path": "/var/sota/storage/bootloader/metadata",
            "action_handler_path": "/usr/bin/bl_actions.sh"
        },
        {
            "partial_verifying": false,
            "ecu_hardware_id": "esp_firmware",
            "full_client_dir": "/var/sota/storage/esp_firmware",
            "ecu_private_key": "sec.private",
            "ecu_public_key": "sec.public",
            "firmware_path": "/var/sota/storage/esp_firmware/firmware.bin",
            "target_name_path": "/var/sota/storage/esp_firmware/target_name",
            "metadata_path": "/var/sota/storage/esp_firmware/metadata",
            "action_handler_path": "/home/torizon/esp_firmware.sh"
        }
    ]
}
Configure the Firmware Update Instructions
Before creating the action handler file (esp_firmware.sh), create a script (update_script.sh) in the host machine with the mechanisms that provide the firmware to be updated.
#!/bin/sh

echo "Updating external firmware ..."
sleep 1

# Set the boot configuration, ensure that the ESP8266 is in firmware flashing mode (flash)
gpioset gpiochip0 0=1
gpioset gpiochip0 0=0
sleep 0.2

# Reset the ESP8266
gpioset gpiochip0 1=0
sleep 0.2
gpioset gpiochip0 1=1
sleep 0.2

# Load new firmware (flash)
python3 ./esptool.py --port /dev/ttymxc0 write_flash -fm dio 0x00000 /esptool/firmware.bin
sleep 1

# Set the normal boot configuration again and restart
gpioset gpiochip0 0=1
sleep 0.2
gpioset gpiochip0 1=0
sleep 0.2
gpioset gpiochip0 1=1
sleep 1

echo "Sucess!"
This file is responsible for setting the ESP8266 into firmware flash mode, loading it through the ESPtool (recommended by manufacturers for this purpose), and restarting the device with the new firmware.
Then, in the host terminal, the execution permission is added to the script:
chmod +x update_script.sh
To enable this update to occur automatically, configure a container to perform the steps of the update_script.sh file. Thus, the following Dockerfile should be created in the host machine in the same directory as update_script.sh, configuring the container environment and including all the necessary dependencies for the ESPtool:
FROM torizon/debian:3-bookworm
RUN usermod -a -G gpio torizon

#Install applications to be used within the container
RUN apt update && apt install -y --no-install-recommends \
    git python3 python3-pip python3-serial gpiod libgpiod2 && \
    apt-get clean && apt-get autoremove && \
    rm -rf /var/lib/apt/lists/*

#Clone the ESPTool tool
RUN git clone https://github.com/espressif/esptool.git /esptool

#Set our working directory
WORKDIR /esptool

#Copy our update file into the container and allow it to be executed
COPY update_script.sh /esptool
RUN chmod +x /esptool/update_script.sh

#Run our update script
CMD [ "/esptool/update_script.sh" ]
To build the container in the host machine, enable the Arm emulation and use the flag --platform linux/arm64/v8 in the docker build command.
Finally, after building the container and pushing it to the DockerHub, the esp_firmware.sh is created:
#!/usr/bin/bash
# ---
# Main program
# ---
case "$1" in
    get-firmware-info)
        # Perform normal processing for this action.
        echo "ACTION HANDLER: get-firmware-info"
        exit 64
        ;;
    install)
        # Perform normal processing for this action.
        docker run --rm -v /dev:/dev -v $SECONDARY_FIRMWARE_PATH:/esptool/firmware.bin \
        --device-cgroup-rule='c 207:16 rmw' --device-cgroup-rule='c 254:* rmw' \
        <docker_user_name>/esp_flasher:arm64 > /var/logs
        echo '{"status": "ok", "message": "Container executed"}'
        exit 0
        ;;
    complete-install)
        # Perform normal processing for this action.
        echo "ACTION HANDLER: complete-install"
        exit 64
        ;;
    *)
        # Perform normal processing for this action.
        echo "ACTION HANDLER: ERROR event $1 not supported"
        exit 64
        ;;
esac
Be aware to change <docker_user_name> with the proper DockerHub user name. Also, check if the name and flag (esp_flasher:arm64) are the same as defined during the build.
After all these processes, the firmware update mechanisms are ready to be used in the Torizon Cloud.
Update in Torizon Cloud
After logging in to the Torizon Cloud, one should follow the steps to proceed with the subsystem update. In the case of not having an account, sign up for free or one of our plans. Check our plans for more details.
Provision the SoM
The first step will be to provision the System on Module on Torizon Cloud by clicking on Provision Device in the left column of the dashboard. A new tab will open on the screen. On this tab, the Docker command provided intends to be pasted in the terminal logged in the SoM. This command will carry out the provisioning of the device and prepare it to show its metrics on the Torizon Cloud platform. After these steps, the device will be listed as a provisioned device. The video below brings the steps.
Add the Firmware Package
To add the new firmware, use the middle column on the platform, select Add new package, and then choose the Other option. The firmware used may vary depending on the secondary device. Some changes can be made according to preference, such as the name and version of the files.
Update the Firmware
To initiate an update for the device, click on the start arrow in the Dashboard Recent Devices column. Then, select the secondary device to be updated, and choose the package to be installed on it. The previously loaded packages in the Torizon Cloud system appear after selecting the My Uploads box. Choose the package version, then confirm the update.
For more information about the update status, select the More info option in the Update Status section. All the steps from the download to the installation of the new package will be displayed.